Free Seating and Floorplan Tool – AllSeated Tutorial #2: How to Add Guests and Custom Seating Charts
We love Allseated‘s free seating and floorplan tool. In this tutorial, learn how to design your own seating arrangements, add guests, and even assign meal selections.
In the first tutorial, you learned how to create an event and begin placing objects into your floorplan. Today, we will focus on one of the best features of allseated–adding guests and assigning seats to make a quick, easily editable, visual representation of your event’s seating layout.
#1 Main menu “Guests” tab
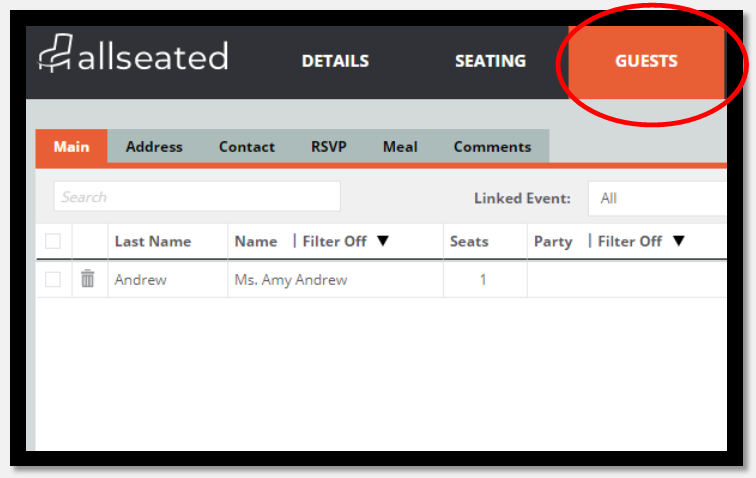
From the main menu at the top of your screen, select the “Guests” tab and notice the sub menu with the following options:
Main / Address / Contact / RSVP / Meal / Comments
These all provide the option to add more detail about your guests. For now, stay on the “Main” sub-tab.
#2 Add guests
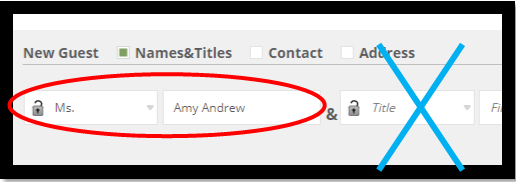
At the bottom left of the screen, you can enter names of your guests (red circle). If you want to be able to access each guest individually (so you can seat them individually–which is the best way to use the tool), only add one person at a time (as opposed to entering guests as a couple). Therefore just use the first two white boxes to enter title (Mr./Mrs./Ms./etc.) and then put both first and last name in the second box (avoid entries in the area with the blue X in the image).
#3 Link guests
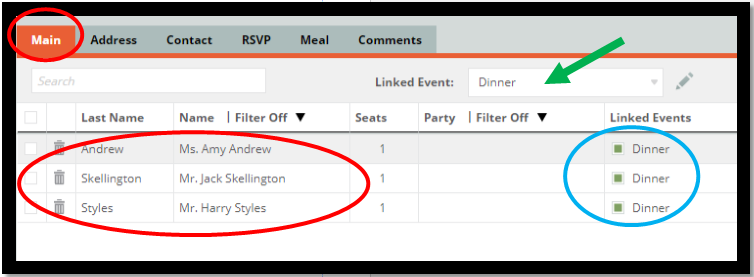
Once you enter a guest name, they will appear in a list (red circle) under the “Main” tab (within the “Guests” main menu tab). From there, you will want to link them to your event. Select your event (pull down menu at the green arrow) and make sure the selected event is checked for each guest (blue circle).

#4 Assign meals
This is a bonus tip on how to further use the options available to you under the main menu “Guests” tab. Under the sub-menu “Meal” tab (small red circle) you have access to your guest list with the option of assigning them a meal – an easy way to keep track of both your seating chart and your catering numbers. Like the step above, select your linked event (large red circle) and then under the “Meal” column (green arrow), you have the option to select a meal (once you click the pulldown menu you have the option of entering in your custom meal options).
#5 Access guest list in your floorplan
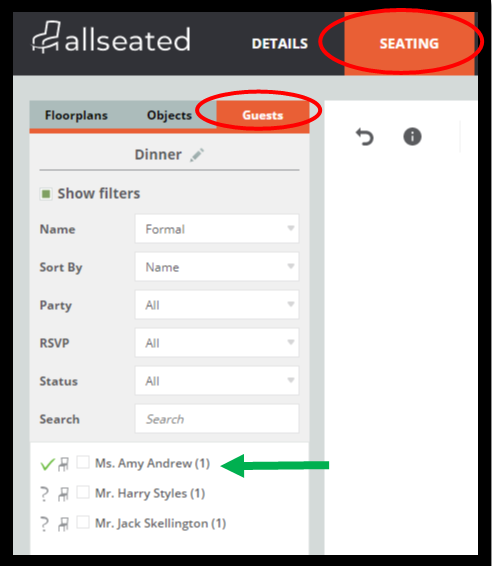
From the main menu, select the “Seating” tab and then in the submenu on the left, select the “Guests” tab. Whatever guests you entered in the previous steps will show up here (as long as you’ve linked them to the event you’re now editing–see #3). A green checkmark next to a guest’s name indicates they’ve been assigned a seat. The gray question mark notes guests that haven’t been added to your floorplan yet.
#6 Assign guests to tables
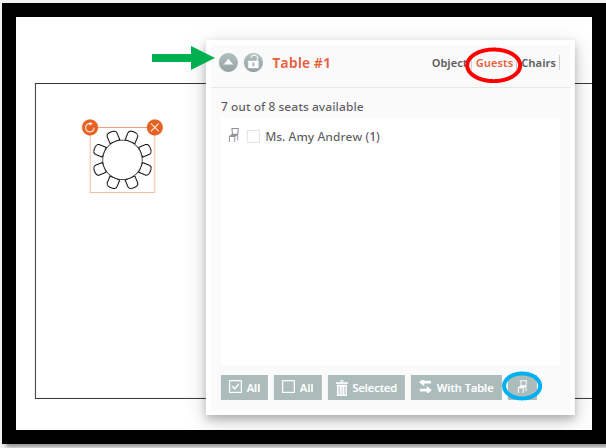
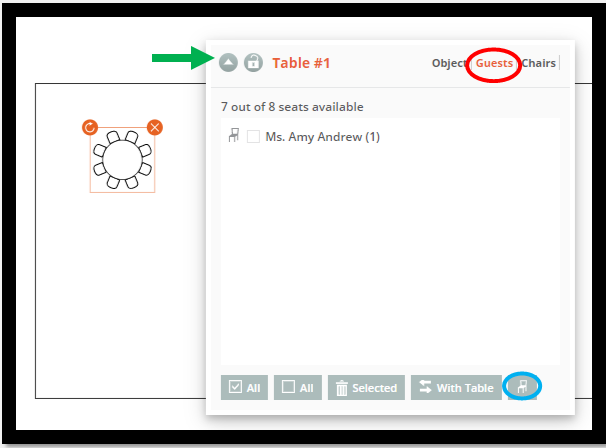
Select a table (with seats) that you’ve added to your floorplan. If you don’t see the full menu as indicated in the image, you can select the triangle (green arrow) to open and close the info box. Select “Guests” in the top right corner (red circle). To assign the guest, select them and then click on the table in which you wish to seat them. Guest assigned!
Quick tip:
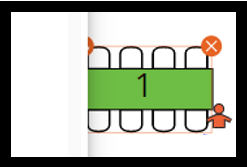
When you click the table with the selected person, the table will flash green if there are more unassigned seats. Yellow flashes when the selected person fills the last available seat at the table. And red flashes when the selected person has been placed at a table where all seats were already assigned.
#8 Access individual seats
Under the same menu from #7, select the little chair icon in the bottom right corner (small blue circle). This will give you access to the list of guests you’ve assigned to that table.
#9 Assign seats!
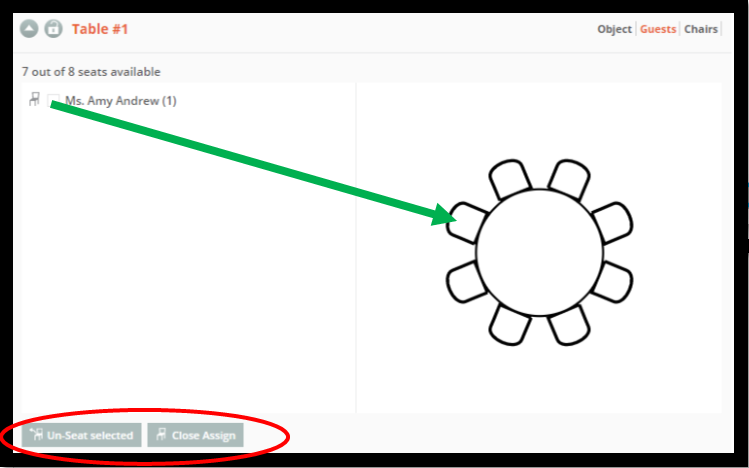
From the list of guests at the selected table, select one (a little person icon will show) and then click the specific seat for the guest. Green seats indicate a guest has been assigned and the seat is taken.
#10 Un-assign seats
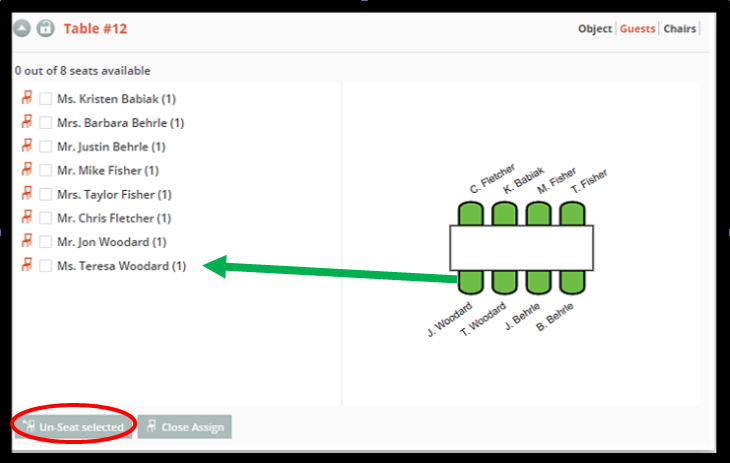
To change seats, click a green chair to un-assign someone. The person icon will show up and you can drag them to the “un-seat selected” box in the bottom left corner (red circle). You can also drag the selected person and then click their name on the left list (green arrow) to remove them from the seat. White chairs indicate an unassigned seat.
#11 Remove guests or switch tables
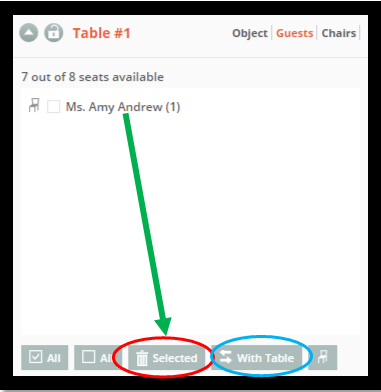
To remove someone from the table entirely, you can select the guest and then click the little box with the trash can icon (red circle). This will move your guest back to the original guest list in the “Guests” sub menu – see image from #5. To move them to another table, select the double arrow icon box (blue circle).
If you liked Free Seating and Floorplan Tool – AllSeated Tutorial #2, make sure to check out our first AllSeated tutorial here!
